Monday, May 9, 2016

ATTENTION! I ACTUALLY PASSED THE LAB!


Over the weekend, I worked hard to understand how to set up the dimensional analysis for this lab. I started by writing down the things I knew how to convert then tried to connect point A to point B. It ended up being less confusing than I though, but it did take me a while to figure everything. I did a few test trials at home with different sized bags. They were all successful! I felt fairly confident going into the lab today but also a little nervous. Thankfully I was able to pass the lab and move on to studying for the test on Friday!


Friday, May 6, 2016

Airbag Lab

Today we got the rubric for the Airbag lab that we are going to do on Monday and I am very nervous about the lab. We were told that we have to write the procedure and all the possible conversion factors that would be used in order to figure out what amount of baking soda and vinegar are needed to run the experiment. We also were given no measurements! All we will recieve on Monday is the pressure and temperature of the room. I am very confused on how I am supposed to write a procedure and the stoichiometry without really knowing what the lab is or any data that we will use!

Below are two links that I think might help me with the calculations for the lab: Video 1 (shorter)
Video 2 (long)
 THESE LINKS ARE VERY HELPFUL!!!!!!

Wednesday, May 4, 2016

Avagadro's Law and Combined Gas Law

Gas is at a constant pressure and temperature
volume is directly proportional to the number of moles
Equal volumes of gases at the same temperature and pressure have the same number of particles
http://wps.prenhall.com/wps/media/objects/4678/4790892/images/aabjvhsa.jpg

Tuesday, May 3, 2016

Charles Law!

So Far So Good

Temperature and Volume
Temperature and volume vary directly with each other
Moles and Pressure are help constant
All temperature must be written in Kelvin for Charles Law
Kelvin is set on an absolute scale
Absolute zero= there is no kinetic movement of molecules at all

http://thescienceclassroom.org/wp-content/uploads/2013/04/Charless-Law.png


http://images.tutorvista.com/cms/images/83/celsius-to-kelvin-formulae.png

Monday, May 2, 2016

First Day of Gas Laws

TODAY WE LEARNED ABOUT GASES!!!!!!!!! LAST UNIT! THE END IS NEAR!!!!!!!!!

Volume (V)= Liters(L)
Pressure(P)= 1 atm (1.015x10^5)
Temperature(T)= Kelvin(K)
Number of atoms

Highly compressible
No definite shape or volume
Homogeneous mixture
Collisions are elastic


https://kaiserscience.files.wordpress.com/2015/09/common-units-of-gas-atmosphere-pressure.jpg
Four Factors that Determine the State of a Gas:
Pressure
Temperature
Volume
Amount (usually measured in moles)

http://reich-chemistry.wikispaces.com/file/view/combined.gif/34136171/148x70/combined.gif
tells us that the relationship between pressure and volume is an inverse relationship. It deals with two of the four factors that determine the state of a gas: pressure and volume. It holds true at a constant temperature.

Monday, April 18, 2016

Heat Capacity of a Metal Lab

Today we got to complete the metal lab! Because of time restraints, we could not do both copper and lead so we had to pick which one we wanted to try. Half of the class did copper and the other half did lead. My partner and I choose to do copper. During the experiment, we used a form of calorimetry to determine the specific heat of copper. By measuring the increase in temperature of the water in which we put the copper in, we calculated the specific heat of the metal. We set the energy gained to the negative energy lost to find the answer. The steps we followed today:
  1. Places 100.mL of room temp. distilled water into a Styrofoam cup and recorded temp.
  2. Find the mass of the test tube
  3. Place metal in test tube about 1/3 of the way
  4. Find the mass of the test tube with metal
  5. Heat the metal up in a water bath to boiling. Let boil for 5 minutes then record the temperature of the water (the metal should be the same temp.)
  6. Pour the metal into the water with the Styrofoam cup. Place probe in cup and stir 
  7. Record the highest temperature reached by the water
Our Data:
  • mass of test tube- 15.9355
  • mass of test tube and metal- 54.9484
  • initial temperature of metal- 100.1 oC
  • initial temperature of H20- 23.4 oC
  • final temperature of metal and H20- 27.5 oC
 Using this data we were able to find the specif heat of copper!


Overview or explanation of lab
How to calculate specific heat

Friday, April 15, 2016

First Lecture

http://1048believe.com/wp-admin/js/specific-heat-capacity-formula-physics-i0.jpg

We learned about heat as a form of energy change. Heat occurs when bonds are formed, not when bonds are broken in chemical reactions. Exothermic- when energy leaves a system. Endothermic- when energy enters a system. Endothermic vs Exothermic
                                                        
Measuring Energy Changes

https://dr282zn36sxxg.cloudfront.net/datastreams/f-d%3Adf0a2687d885c997ec852a60b09181c51b0a234ada913
6e0288d4e8c%2BIMAGE_THUMB_POSTCARD%2BIMAGE_THUMB_POSTCARD.1
Measuring Energy Changes: converting Calories to calories and reverese

http://www.sartep.com/chem/images/calorieconvert.gif
 

Types of Energy
  • Kinetic Energy- energy of motion
  • Radiant Energy- energy from the sun or solar energy
  • Thermal Energy- energy associated with the random motion of atoms and molecules 
  • Chemical Energy- energy stored within the structural units of chemical substances
  • Potential Energy- energy stored or energy of position

Wednesday, April 13, 2016

Boat Race


Today we tested our biodiesel boats! Throughout the week we worked on building our boat (S.S. Megan2) and figuring out how to incorporate the motor, making it float, and a spot to put the biodiesel. A few days before my partner and I tested our boat and it went very fast; however, today's runs didn't go so well. We tried going second but realized our motor had a hole in it because it would work. We tried another motor but that too had a hole in it. Finally we found one that worked and did our first run. The time was okay but not as fast as other days. We decided to add bumpers to our boat so it would go straight and not bump into the sides of the gutter. Our second trial went better but still not as fast as our first day. There were many interesting looking boats and I really enjoyed this project! Our class had a wide range of times. Throughout all the classes, we had the fastest and slowest boats of the day.
Example of Boat Races


Monday, April 11, 2016

Biodiesel Day

Today we made our biodiesel to use for our boats later! It was really cool to think that we were Making fuel that works in cars. All we had to do was take oil (either from chick-fil-a or corn oil) and add KOH in an E. Flask with a stir bar in it. Then we put it in a water bath and let it heat and stir for 20-30 minutes. It was surprising that that was the basic process for making biodiesel. After it was done, we put it into a cup and let it sit overnight. Tommorrow we will take off the glycerol fat and leave the good biodiesel to use later. My partner and I were 1/4 groups between all the classes to use corn oil instead of the Chick-fil-a oil.
How to Make Biodiesel

Tuesday, April 5, 2016

Our Biodiesel Video

This week we were working on building a video to promote the use of biodiesel. We started by researching what it was, how it is made, and what the benefits are from using it. Our video had to provide all this information in under a minute. Our final product can be found on youtube if you search "A Better Alternative to Petroleum" or click here. This project was not hard, however, it took a lot of effort and patience to understand the program we were using. Uploading was very tricky, but we were finally able to get it! For website for the video competition, click here.
Two Examples of Biodiesel videos;
Example 1
Example 2


Thursday, March 17, 2016

Chemical Bonding Test

Personally, I did not think the test was that hard. I studied long and hard to make sure my first grade for the quarter would start strong. There was a wide range of questions covering every topic we covered and even a little more. Many of the questions were taken directly of the schoology quizzes so I was able to spend less time on those and focus on the harder questions.
https://cdn4.iconfinder.com/data/icons/social-productivity-line-art-4/128/face-meh-512.png

It scared me when I first looked at my grade after the test because she had put the wrong grades in and mine was much lower than I thought it would be. Thankfully, she fixed the grades and I did fairly well. Most of the questions I missed were because of a stupid mistake. For example, one question asked what was the shape of Y and I looked at the shape of X. Overall, I didn't think the test was too terribly hard.

Some websites I used to study are:
Resonance
Chemical Bonds and the Shape of Molecules

Friday, March 11, 2016

Chemical Bonding Activity

Today we met in the library and working on chemical bonding problems with three other people. We sat on these little bean bags that we a little uncomfortable at a little table but that was the only bad part. This activity really helped me to understand the many different parts of the unit. By talking it through with partners and drawing it out on the table, I was really able to visualize the concepts that we learned in class. 


Tuesday, March 8, 2016

Types of Bonds, Bond energy, and Lewis Structure

Covalent vs Ionic Bonds
Covalent Bonds

  • result of the sharing of electons by two nonmetals
  • both atoms involved in the bond share electrons to fill their particular octet
Ionic Bonds
  • involves the giving and reciving of electrons between a cation and an anion
  • oppositely charged ions then attract to each other forming a bond
  • Atoms cannot have more than 8 electrons 
  • A full 8 electron shell is considered stable
  • Some atoms don't need 8 electrons
Exceptions to the rule:
  • hydrogen and helium only requires 2 electrons
  • boron only requires 6 electrons to be stable, but it will form 4 bonds when necessary
  • beryllium will have fewer than 8 as well, it likes 4 electrons in its valence
  • elements in period 3 and beyond can have expanded octets because the d sublevel becomes available (ex. sulfur, phosphorus, xenon, krypton)
  • figure out how many valence electrons are needed for the atom
  • write the atom's symbol in the center
  • place electrons singularly on each side before doubling up the electrons until all valence electrons are placed
  • EX: Nitrogen has 5 valence electrons which are placed in the Lewis structure below
  • Single bonds: longest and weakest bonds
  • Double bonds: shorter and stronger than single bonds
  • Triple bonds: shortest and strongest bonds

  • read from right to left
  • the lowest point on the graph is high energy and where the bond forms
  • 0 energy is when the two atoms are isolated from each other
  • energy being absorbed is the same amount of energy being released

Wednesday, March 2, 2016

Periodic Table Trends

Trends in Atomic Size

  • As you move down a group, the atoms tend to get larger. (electrons are being added to larger orbitals and inner electrons tend to shield the nucleus so the outermost electrons tend to fell less pull or attraction from the nucleus)
  •  And as you move across a period from left to right, the atomic size decreases. (adding more protons without much increase in shielding)
Trends in Ionization Energy
  • Ionization energy- the energy needed to remove an electron from a gaseous atom
  • removing an electron results in the formation of a cation
  • The energy required for removal of the first electron is known as the first ionization energy. The energy required for removal of the second electron is known as the second ionization energy.
Trends in Electron Affinity
  • Electron Affinity- the ease with which an electron many added to an atom, forming an anion
  • Increases as you move up and to the right.

Trends in Electronegativy
  • Electronegativity of an element is defined to be the tendency of an atom to draw electrons toward itself when chemically combined with another element.
  • Noble gases are not included


Tuesday, February 23, 2016

Spectroscopic Anaylsis of Cobalt and Copper Ion

Today we used a spectrophotometer to determine each ions transmittance and incident of light. It was an extremely monotonous and time consuming lab. Every time we changes the wavelength on the machine we had to reset it with a water test tube. It seemed almost pointless to do this lab, but we are going to use the information to analyze it on a graph. Hopefully that helps me understand the purpose behind the lab.
Explanation of how to use the machine


Friday, February 19, 2016

Electron Configuration


https://mrkubuske.files.wordpress.com/2013/03/ec-periodic-table1.jpg
This lecture was confusing at first, but got easier as we went along. We first had to color in the s,p,d, and f sub levels on our periodic table. Then we used the periodic table to classify the elements based on the number of electrons they had. In addition, we had to write the electron configuration of elements by using the valence electrons, and using the classifications on the periodic table. We also used the elements that accept electrons from lower levels in order to write their configurations correctly. During this lesson, we also looked at the 6 transition elements (Cr, Cu, Mo, Ag, W, Au) that do not always follow the rules that the other elements do.

Video Explanation Bozeman Science

Thursday, February 18, 2016

Flame Test Lab


http://tse1.mm.bing.net/th?&id=OIP.M0bd6e5cdb4adad834a7e546c21542e7co0&w=264&h=188&c=0&pid=1.9&rs=0&p=0
http://tse1.mm.bing.net/th?&id=OIP.Ma829a642be5b3f237c966ac0a1a72f88o0&w=300&h=207&c=0&pid=1.9&rs=0&p=0

I was unfortunately not present today for this lab, but I was able to find this video on the internet that explains what they did in class today. It looks like it was a very interesting lab! I wish I could have been there for it. In simple terms, they took different metals and placed them in the flame of a bunson burner to see what color they produced. They then compared the color to an unknown metal and used the data they collected to figure out each lights wavelength. Then we calculated energy in jewels/mole.

Wednesday, February 17, 2016

Energy, Wavelength, Speed

http://wps.prenhall.com/wps/media/objects/3311/3390683/imag0601/TB06_001.GIF
Today's lecture wasn't that complicated at all. All we needed to do is memorize the two formulas in order to find wavelength, frequency, and energy of transverse waves. We had to pay close attention to the units each number was in. If it was in a different unit, then we had to convert it back into the correct measurement before finishing the problem. Along with memorizing the formulas, we had to memories two constants (speed of light and Planck's constant) in order to solve the problems. Once you memorize the formulas and constants the rest is really easy since it is just plug and chug!

http://media-cache-ec0.pinimg.com/736x/7d/3d/2a/7d3d2ad86b1a88db0a1d1e1634f49496.jpg


Tuesday, February 16, 2016

First Day of Electronic Structure Unit


Today in class we got to read about fireworks and how they function. We learned about the chemistry behind them, what makes them explode, and why they give off different colors. Some interesting facts we learned:
  1.  The explosion of a firework happens in two steps: The aerial shell is shot into the air, and then it explodes into the air. 
    • To propel the shell into the air, the shell is placed sinside a tube called a mortar, whcih is oftben partially buried in sand or dirt. A lifting charge of gunpowder is present blelwo the chell with a fuse attached to it. When ignited, the gunpowder exploded, creating lots of heat and gas that casue a buildup of pressure beneath the shell. When the pressure is great enough, the sheel shoots up into the sky.
    • After a few seconds, another fuse inside the aerial shell, ignites causing the bursting charge to explode. This in turn ignites the black powder and the stars which rapidly produce lots of gas and heat which causes the shells to fly in every direction then burst open sending light into the dark sky.
  2. Colors are formed in two ways: luminescence and incandescence
  3. Colors come from the metal cation which absorb energy from the heat, causing them to become excited. 
  4. Consumer fireworks can have no more than 50 milligrams of gunpowder.
  5. Pyrotechnic chemists work to create different fireworks and increase firework safety.
Very Brief Explanation of Fireworks
A more in depth explanation

Tuesday, February 9, 2016

Finding the Mass of the Unknown Acid Lab

Today we finished writing our note card for the unknown acid lab! My partner and I were able to finish a day early because we used our standard from the last lab. Using our data, we did the math to find the molar mass of the substance, which between the two trials averaged about 177 g. I really enjoyed these labs due to the competition to get the best percent error. We were really focused on getting the exact amount of NaOH used. Below is our calculations for the lab and our results. We got around a 1.7 percent error!
Explanation of Lab

Monday, February 8, 2016

First day of Unknown Acid lab

Today we began our Unknown Acid lab! In order to complete this lab, we completed a titration of an unknown substance to find its molar mass. To start, we measured the amount of the acid and dissolved it in 100 mL of water and added 2-3 drop of phem. (an indicator). In order to get it to dissolve, we had to heat the solution on a hot plate, as well as add a stir bar to better mix the substance because it was partially soluable. Once the solution was completely dissolved, we let it cool then titrated the substance with NaOH until the substance turned pink. We took the measurement of the amount of NaOH used to titrate the solution and the amount of unknown acid we used to dissolve into the mixture. We will use this data tomorrow to calculate the molar mass of the unknown acid.
Reminder on how to titrate


Thursday, February 4, 2016

2nd day of Titration lab

Today we got to run our experiment! We had to move pretty fast because we had to get four trials done total (2 KHP, 2 Vinegar) in one class period. Below are our steps we followed for the day:
  1. Put on googles
  2. Drain burette
  3. Fill with small amount of NaOH and coat the sides of burette
  4. Dump excess NaOH into waste beaker
  5. Fill burette to 0 mL
  6. Measure .4-.6 grams of KHP and record mass
  7. Dump KHP into E. Flask and fill with 100 mL of water and ensure all KHP makes it into the flask
  8. Mix the solution until all the KHP dissolves
  9. Add 2-3 drops of phem.
  10. Tritate solution until it turns light pink. Record the mass of NaOH used
  11. Dump out contents of E. Flask 
  12. Fill flask with 10 mL of vinegar
  13. Add 100 mL of water and 2-3 drops of phem. 
  14. Titrate until pink and Record.
  15. Repeat
We also did our calculations today and explanation on how to do this can be found below.
Unknown Acid Lab video
How to Calculate Molarity in lab

Wednesday, February 3, 2016

First day of Titration: Getting used to the techniques

Today my partner wasn't here, so I did the practice lab with Ben. We learned how to do the steps for the lab so we would be ready for tomorrow. We went really slow at first because we were nervous, but then Mrs. Frankenberg came by and just poured the NaOH into our Erlenmeyer flask and it turned dark pink. I feel like we are ready tomorrow because we did two trials and we got it on the second try. Hopefully we are as ready as I think we are because this lab our grade is based on our percent error.


Monday, February 1, 2016

Overview of the Quiz

I felt okay about the quiz this week. I studied all weekend, especially on Sunday. During the quiz, I felt good about it until I started to go back and check my answers. I totally blanks on what was hydroponic and what was hydroxide and I started to panic. I think this is a great example of my exhausting that I felt during the quiz. After reviewing what answers I missed, I am very frustrated because they were all stupid mistakes. On one I got the right answer but picked the wrong answer on the test. Oh well... I just hope I don't make these stupid mistakes on the test.

Wednesday, January 27, 2016

Acids and Bases: Arrhenius vs Bronsted-Lowey

Today we learned the difference between acids and bases; everything from the physical characteristics to their chemical makeup. We also learned the difference between Arrhenius and Bronsted-Lowery bases and acids. Below is a quick overview of what we learned:

Physical Properties
  • Acids- taste sour, feel sticky, show red or pink on litmus paper
  • Bases- taste bitter, feel slippery, show blue on litmus paper
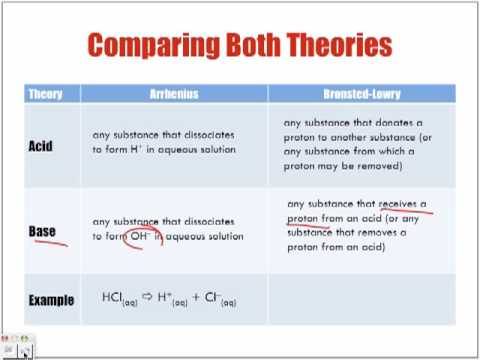
Arrhenius Acids and Bases
http://img.youtube.com/vi/ph5lqm5fi8s/0.jpg
  • Acids- produce hydrogen ions in solution (H+) [HCL--> H+ + Cl-]
  • Bases- produce hydroxide ions in solution (OH-) [NaOH--> Na+ + OH-]
  • Amphitheater substance- can be an acid or a base  [water]
Bronsted-Lowery Acids and Bases
  • Acids- donate a proton (H+)
  • Bases- accept a proton (H+)
  • Conjugate acid- substance formed when a proton is added to a base
  • Conjugate base- remaining substance when a proton is lost from an acid
******* Acids produce conjugate bases, Bases produce conjugate acids********
Acid Strength
  • List of Strong Acids
    • Perchloric acid (HClO4)
    • Chloric acid (HClO3)
    • Hydrochloric acid (HCl)
    • Hydrobromic acid (HBr)
    • Hydroiodic acid (HI)
    • Nitric acid (HNO3)
    • Sulfuric acid (H2SO4) 
If the oxygen outnumbers the hydrogen by two or more, it is considered a strong acid.

For more information or practice use the links below:
Detailed Explanation with Examples
Video explanation
Shorter video
Quiz Yourself

Thursday, January 14, 2016

Stoichiometric Equations


Unfortunately, I was not here for this lesson, so I had to learn it on my own. Below is a picture of my notes that I got from a friend from class:


When I learned it I read the lesson in my book and used multiple internet sources to help me understand how to solve solution stoich problems. Some websites that were especially helpful were:
Explanation of Stoichiometric Equations
Video Explaination
Practice Problems

I went in the next day and Mrs. Frankenberg explained it in simple terms.
(L of Substance A) x (Molarity of A) x (mole ratio) x (L of B) = (Molarity of B)
You will have to change it depending on what information is given, but this is the general formula for a Solution Stoich problem.

Wednesday, January 13, 2016

First day of Mystery Lab

Today we began our lab to figure out who  the murder was at the crime scene. We first tested the unknown solution with Sodium chloride and Sodium Carbonate to see what type of solution the unknown was. Once we figured out it was Silver nitrate (because it formed a participate) we moved on to the next step. We then mixed 25mL of Silver nitrate with 50mL of Sodium Carbonate in a beaker. Then we poured the solution into a weighed filter paper over a flask. Then we let it drip until all liquid was taken out and then we left it on top to dry.
Result of Another high school group lab, shown dramatically

Tuesday, January 12, 2016

Weekly Quiz

This weeks quiz was both hard and easy. There were many questions I felt 100% confident about, however, there were also many I was uneasy about. I need to review how to read solubility graphs when the amount of water used on the graph does not match the amount of water in the question that is being asked. I hope the grades get put in soon, so I know what I got!

Friday, January 8, 2016

Good to the Last Drop

Today we did a lab involving serial dilutions using water and food coloring. It was very simple to complete and the colors we made we actually really cool. This unit is actually very interesting so far!
How to Calculate Serial Dilutions
Explanation of our lab