Today, we took notes on the subject of half lives, did some practice problems, and applied the knowledge into a lab. This lab demonstrated the radioactive decay process of half-lives and gave up a tangible example of the concept. My partner and I started the lab by drawing 24 by 24 squares on a piece of paper and cut them out. We discarded 9 boxes so we were left with 576 little square papers. That was definitely time consuming and tedious. Next, we placed all the squares in a cup and mixed them up and dumped them out onto the lab counter. All the squares that landed pattern side up were counted as the decayed material and the white side represented the material that was left. We counted both sections and recorded the number in the data table. After that, we discarded all the decayed atoms and used the white atoms and repeated the steps again until we reached 6 half-lives. This lab took a long time, but it helped me fully understand the concept of half lives. With the information gained from this lab, I hope I will do well on the half-life portion of the exam.
 |
| http://www.cigars4dummies.com/uploads/How_to_save_paper.jpg |
 |
| http://www.chem.purdue.edu/gchelp/howtosolveit/Kinetics/KineticsArt/A_vs_t_1st_order.JPG |
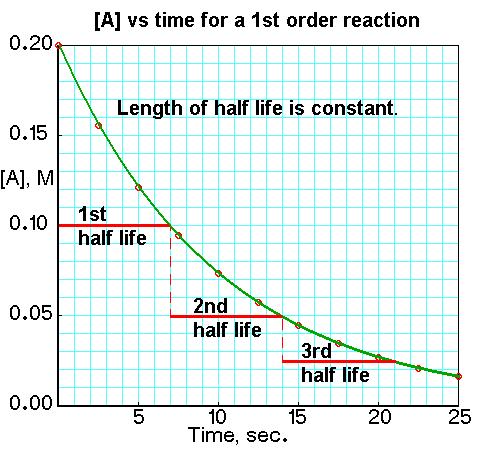
If you are still having trouble calculating half-life or understand the concept, watch this
half-life video and it will definitely help! Also, the
SoftSchools website is good tool if you want to take practice tests and quiz yourself on half-life problems! Good luck!

Wow, fantastic blog post. You are the first one that I have seen put a video in the post for those who need extra help. You also included a website where you can practice half-life problems on. Providing both of those is phenomenal and really helpful for those who need some extra practice.
ReplyDelete